General Disclaimer:   (HV) (DC) injury or death hazard,   use at your own risk,   may void warranty.

Difference between revisions of "PriusPlus-Electronic"

From My wiki
Jump to navigation Jump to search
(→‎Control Board: takes 6-8 hours)
Line 17: Line 17:
  
 
===Parts List===
 
===Parts List===
The public DigiKey parts list for the control board can be found  [http://sales.digikey.com/scripts/ru.dll?action=pb_view&pb_glue=1014148 here]
+
The public DigiKey parts list for the control board can be found  [http://sales.digikey.com/scripts/ru.dll?action=pb_view
 
 
{{EAA-PHEV-PRIUS-ControlBdPartsList}}


===Assembly Steps===


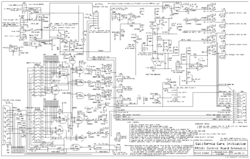
Solder the components to the printed board according to the schematics above.  Make sure to install R3, D1 & D2 1/4 inches off the board and to solder the DIP sockets without the IC's installed.  If new at soldering, make sure to use a heat sink for soldering transistors.


===Installation===


# See [[PriusPlus-Mechanical]] for instructions for physically mounting the control board.


* Add a drawing of the control board schematic labeling connectors
 
* Show what connects where


===Setup===


Need instructions on how to adjust the pots for the correct temperature.


===Troubleshooting===
 
The LED board will provide useful information for debugging the control board.


==LED Board==
 
[[Image:EAA-PHEV-PRIUS-LEDBdSchematic.png|right|thumb|250px|LED Board, [http://www.expresspcb.com ExpressSCH] [[:Image:EAA-PHEV-PRIUS-LEDBdSchematic.zip|Schematic]]]]
 
Approx. time requirement: 


===Tools Needed===
 
* Soldering Iron
 
* Solder


===Parts Needed===
 
The public DigiKey parts list for the LED board can be found [http://sales.digikey.com/scripts/ru.dll?action=pb_view&pb_glue=1014149 here]
 
{{EAA-PHEV-PRIUS-LEDBdPartsList}}


==CAN-View & EV Mode button==
 
===Overview===
 
You will need to purchase [[CAN-View]] from [http://hybridinterfaces.ca hybridinterfaces.ca].  There are currently 2 versions of [[CAN-View]] available.  Version 3 requires an '04 or '05 Prius and makes use of the built in display (or [[MFD]]) while Version 4 works with an 04-07 Prius but requires an external touchscreen (since the built in touchscreens were changed in the '06 model and are no longer compatible.)  Version 3 has the PHEV relays built onto the main board, while version 2 has an extra optional PHEV relay board.  This PHEV relay board is required for this conversion.


===Installation===
 
Approx. time requirement:  1-2 hours


The [[CAN-View]] is installed differently depending on whether or not your car is equipped with in-dash navigation.  Detailed instructions with photos are available [http://www.hybridinterfaces.ca/installWNAV.html with NAV] or [http://www.hybridinterfaces.ca/installNONAV.html without NAV].  It is best to install and route the wires for the [[Prius EV Mode Button]] at the same time since they both require disassembling the dash.


'''ToDo''' the following section is shared with the [[PiPrius_conversion_process#CAN-View_.26_EV_Mode_Button]] documentation.  Any changes should be generic enough to satisfy both, place project specific notes above or below it.  Another set of instructions may be needed for the CAN-View Version 4 which does not integrate with the OEM [[MFD]] and gets power directly from the OBDII port, [http://priuschat.com/index.php?act=ST&f=62&t=27906 Prius CAN View V4 Mounting options] at PriusChat.com covers various ways of mounting the second touch screen.


{{Prius CAN-ViewV3 & EV-Mode Button}}


===Configuration===
 
# Configure CAN-View'''ToDo''''', these are [[PiPrius]] not [[PriusPlus]] settings ''.
 
## RL1 = EV-Mode Button trigger '''ToDo'''
 
## RL4 on if bat.temp. < '''+111''' DegF '''ToDo'''
 
## RL4 on if CCL is > '''40''' ACL '''ToDo'''
 
## Battery Capacity '''10.0Ah''' '''ToDo'''
 
## RL2 = < 0 > 0% SOC and > 0 < 0 ACL, 0s, NO '''ToDo'''
 
## RL3 = < 0 > 0% SOC and > 0 < 0 MPH, 0s, NO '''ToDo'''
 
## RL5 = < 0 > 0% SOC and > 0 < 0 MPH, 0s, NO '''ToDo'''
 
## RL6 = < 0 > 0% SOC and > 0 < 0 MPH, 0s, NO '''ToDo'''


===Troubleshooting===


==References==
 
<references/>
 

Revision as of 15:12, 11 April 2007

Click show for a short list of the current PHEV conversion and kit options for the Toyota Prius.

For Prius conversion details see the Prius PHEV article and comparisons table.

  1. Ron's Original PriusPlus History and current Contactor Based PriusPlus documentation for DIY projects.
  2. Ryan's PriusBlue is the testbed for DC-DC PFC Based PiPrius kits and documentation for DIY projects.
  3. Toyota OEM Prius PHEV and Prime Could use some work on this page
  4. Enginer China. But the rest of these appear to all be defunct as of 2020?
  5. |~- Hybrids-Plus USA/Colorado/Li -~|~- EnergyCS USA -~|~- Hymotion USA/Canada -~|~- Amberjac UK. -~|~- EDrive USA -~| Peter mentioned Plug-In Conversions |~-

--={ Project Overview }={ 2007 Maker Faire }={ Theory }={ Instructions }={ Parts List }={ RawData }={ Latest News }=--
--={ Doc Process }={ Mechanical }={ Electrical }={ Electronic }={ Interest }={ Talk:PriusPlus Main Discussion }=--

--={ Historic }={ Battery }={ Schematics }={ PseudoCode }={ Photos }=--

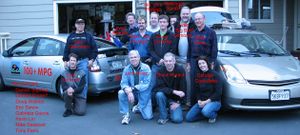
Team Photo from the PriusPlus conversion of Sven's Prius from Nov 2006.

This is the home of the PRIUS+ PHEV DIY (Do-it-Yourself) documentation. These pages are currently anonymously editable, which may change in the future. Please feel free to use the Discussion page for general discussion and commentary on the main article. If you would like to add to an existing section use the "edit" link near that topic's heading. Don't forget to use the Summary field to describe your changes. While editing use the "Show Preview" button to make sure your changes look like you expect them to, before you click "Save Page".


Intro Paragraph here maybe with a link to the main PriusPlus article, links to external sites can appear as formatted CalCars, just plain URLs like http://www.calcars.com, or fancy references such as that in the next paragraph.

Another Paragraph and such, you can get help at our Help:Contents#How do I use the Wiki Website page <ref>http://en.wikipedia.org/wiki/Help:Contents more help using the wiki.</ref> Feel free to simply remove or if you like move all of this example text to the pages discussion article.

Control Board

Control Board, ExpressSCH Schematic

Approx. time requirement: 6-8 hours

Tools Needed

  • Soldering Iron
  • Solder

Parts List

The public DigiKey parts list for the control board can be found [http://sales.digikey.com/scripts/ru.dll?action=pb_view