|
General Disclaimer: (HV) (DC) injury or death hazard, use at your own risk, may void warranty. |
PiPrius
Contents
Rich Rudman of manzanitamicro, Ryan, and PriusBlue, are working on a Prius PHEV implementation using an upgraded PFC-30 as a DC-DC converter and charger, and Rich is hoping to develop and offer conversion kits.
Misc development related stuff:
- Good Electrical-Boxes at www.canev.com
Logs
CAN-View Logs from Initial PHEV Test & Tune runs:


- 2006.05.27 - Image:Capture001.zip - 2 short PHEV tests, no relays used, CCL issues, 1 charge.
- 2006.05.29 - Image:Capture002.zip - 4 PHEV tests, SOC relay trigger, 30.2 miles, 3 charges.
Current CAN-View Relay settings:
- RL2: on <69 off >70%SOC & on >70 off <70Acl
- RL3: unused
- RL4: OEM/PHEV selected & >40Acl & Bat <105degF
- RL5: unused
- RL6: on <74 off >74%SOC & on >50 off <45mph
- RL2 (Low) and RL6 (High) speed SOC driven relays are connected in parallel to trigger the PFC to enter NiMH High Voltage setpoint (239V), otherwise PFC is in NiMH Low Voltage setpoint (227v).
- 2006.07.15 - Image:Capture003.zip - Trip to Manzanita HEV/PHEV mixed-mode
Added LowBatReg, a single MarkIII regulator which communicates with PFC to lower current levels in order to keep known lowest PbA battery above 10.0v. Eventually all batteries will have such regulators protecting each from over and under voltage events. Regs will also enhance the ability to equalize the pack and charge safely without manual monitoring.
- 2006.07.16 - Image:Capture004.zip - 3 short mostly EV-Only trips & a P3000 DTC.
Restored OEM cooling system to original state, finished testing degraded OEM cooling.
- 2006.07.17 - Image:Capture005.zip - Ryans commute, and repeat of Cap004.
- 2006.07.18 - Image:Capture006.zip - Ryans commute, much improved performance on return trip.
- 2006.07.19 - Image:Capture007.zip - Ryans commute.
- 2006.07.20 - Image:Capture008.zip - Ryans commute.
- 2006.07.23 - Image:Capture009.zip - Four consecutive tanks during a road trip.
- See also PriusBlue Mileage & File:MyMileage.zip spreadsheets for more trip data and details.
Each .zip file contains a main description .txt file similar to the comments which describe it. There are also multiple CAN-View Capture "raw" .txt files and their resultant .csv files. Each capture file is described with dash miles-mpg|CAN-View Trip screen miles-mpg|CAN-View Ah Count down from 10Ah, a description of the trip, and the amount of recharge.
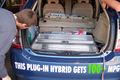
Photos
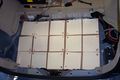
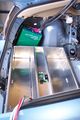
Battery Layout for PiPrius
Reverting previous battery tap & HV modifications
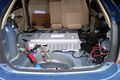
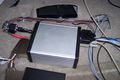
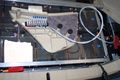
PFC-30(40A) mounted in drivers corner.
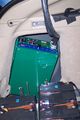
CAN-View v2 with new relay board wired,
Other end of CAN-View relays # 2-6
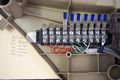
Other end of CAN-View relays # 2-6 (closeup)

Dry fitting new battery rack
New battery rack and MMPFC
Will hold 15 Hawker EP26 or Areo AB26's
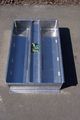
1 or 3 rails shown which will house battery regs.
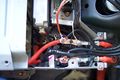
OEM HV tie-in.


Conversion Procedure
| General Disclaimer: (HV) (DC) injury or death hazard, use at your own risk, may void warranty. |
|---|
|
HV (High Voltage) DC (Direct Current) Warning: Traction Battery Packs, Motors, Chargers, and other HV sources could cause serious injury or death if proper precautions are not taken while working on or around such High Voltage Direct Current sources. Use this information at your own risk: There is no warranty expressed nor implied and we are not liable for any of your past, present, nor future actions. Even should you perform these modifications to the letter you could still damage any number of components in your vehicle causing it to no longer function. Even if it appears to function properly your actions may cause it to self destruct with collateral damage to surrounding properties other than your vehicle. By utilizing these ideas and instructions in an attempting to enhance national security, reduce gas consumption, vehicle "emissions", your carbon footprint, or smog, you do so at your own risk & peril. Warranty: In performing some of these modifications you may void your warranty with the vehicles manufacturer. See also our My wiki:General disclaimer |
This is the Initial Conversion Process.
- Remove trunk carpet, all storage compartments, and spare tire.
- ! ! Be Sure To Remove Orange HV Service Plug ! !
- Install HV taps to OEM NiMH battery Pack
- Remove rear seat bottom, pull up front edge, unhook rear edge
- Remove rear battery deck upholstery 2x tie down clips ?10mm?, 2x tabs
- Remove drivers side rear seat back 2x 14mm
- Remove drivers side rear seat pillow upholstery 12mm, pull up
- Remove drivers side trunk panel upholstery 10mm, 10mm screw, tabs
- Remove drivers side OEM Battery brace 7x 12mm
- Remove OEM Battery ECU Cover 2x 10mm, 2x 10mm nuts
- Add New HV Cables, Notch Here, Trim There, etc, etc
- Reassemble in reverse order
- Install PFC in drivers side rear wheel well
- Locate and drill mount points from pattern
- Install ventilation housing and fans
- Mount PFC Charger
- Install Battery Box
- Locate, drill, and press nut body/frame mountpoints
- Attach Electronics Box to bottom of lower battery box frame
- Install and fasten lower battery box frame
- Populate box with batteries
- Install battery regulators and interconnects
- Install and fasten upper battery box frame
- Install and configure CAN-View.
- RL1 = EV-Mode Button trigger
- RL2 = ? Voltage dither ?
- RL3 = ? Regen mode ?
- RL4 = Stock / PHEV mode selection
- RL5 =
- RL6 =
- Connect everything... Replace Orange HV Service Plug
Charge, Drive, and Repeat...
| General Disclaimer: (HV) (DC) injury or death hazard, use at your own risk, may void warranty. |
|---|
|
HV (High Voltage) DC (Direct Current) Warning: Traction Battery Packs, Motors, Chargers, and other HV sources could cause serious injury or death if proper precautions are not taken while working on or around such High Voltage Direct Current sources. Use this information at your own risk: There is no warranty expressed nor implied and we are not liable for any of your past, present, nor future actions. Even should you perform these modifications to the letter you could still damage any number of components in your vehicle causing it to no longer function. Even if it appears to function properly your actions may cause it to self destruct with collateral damage to surrounding properties other than your vehicle. By utilizing these ideas and instructions in an attempting to enhance national security, reduce gas consumption, vehicle "emissions", your carbon footprint, or smog, you do so at your own risk & peril. Warranty: In performing some of these modifications you may void your warranty with the vehicles manufacturer. See also our My wiki:General disclaimer |