|
General Disclaimer: (HV) (DC) injury or death hazard, use at your own risk, may void warranty. |
PriusPlus-Electrical
| Click show for a short list of the current PHEV conversion and kit options for the Toyota Prius. |
|---|
|
For Prius conversion details see the Prius PHEV article and comparisons table.
|
|
--={ Project Overview
}={ 2007 Maker Faire
}={ Theory
}={ Instructions
}={ Parts List
}={ RawData
}={ Latest News
}=--
|
|---|
|
--={ Historic }={ Battery }={ Schematics }={ PseudoCode }={ Photos }=-- |
 Team Photo from the PriusPlus conversion of Sven's Prius from Nov 2006. This is the home of the PRIUS+ PHEV DIY (Do-it-Yourself) documentation. These pages are currently anonymously editable, which may change in the future. Please feel free to use the Discussion page for general discussion and commentary on the main article. If you would like to add to an existing section use the "edit" link near that topic's heading. Don't forget to use the Summary field to describe your changes. While editing use the "Show Preview" button to make sure your changes look like you expect them to, before you click "Save Page". |

Intro Paragraph here maybe with a link to the main PriusPlus article, links to external sites can appear as formatted CalCars, just plain URLs like http://www.calcars.org, or fancy references such as that in the next paragraph.
Another Paragraph and such, you can get help at our Help:Contents#How do I use the Wiki Website page <ref>http://en.wikipedia.org/wiki/Help:Contents more help using the wiki.</ref> Feel free to simply remove or if you like move all of this example text to the pages discussion article.
Electronics Tray
Parts Needed
Warning: This list is a very much a work-in-progress!
DigiKey parts can be found here. Mating connectors can be found here.
Non-DigiKey Parts
| Photo | Qty | Description | Manufacture | Model # | Est. Cost |
| 2 | Contactor | Kilovac | EV200-AAANA | $85-120/ea | |
| 2 | Finger safe fuse holder | Bussman | JT60060 | $28/ea | |
| 2 | 60 amp 300 VDC fuse | Bussman | LPJ-60SP | $22/ea | |
| 4 | Black 75 amp connector housings | Anderson | PP75 | ~$2.00/ea | |
| 4 | Red 75 amp connector housings | Anderson | PP75 | ~$2.00/ea | |
| 8+ | 8AWG crimps for PP75 | Anderson | PP75 | $/ea | |
| 6 | Red 15 amp connector housings | Anderson | PP15 | $/ea | |
| 6 | Black 15 amp connector housings | Anderson | PP15 | $/ea | |
| 6 | Green 15 amp connector housings | Anderson | PP15 | $/ea | |
| 2 | White 15 amp connector housings | Anderson | PP15 | $/ea | |
| 2 | Yellow 15 amp connector housings | Anderson | PP15 | $/ea | |
| 22+ | ? AWG crimps for PP15 | Anderson | PP15 | $/ea | |
| 3 | 12v Fans | $1-5/ea |
DigiKey Parts List
Parts list for High Power Schematic
- Download the Digikey HV parts list Media:EAA-PHEV-PRIUS-HVPartsList.zip (Excel spreadsheet)
Sub Parts
Diode
The diode must be firmly and correctly mounted to the heatsink. The diode has a 1/4" stud which passes through the heatsink but does not touch the heatsink. A shoulder or insulating nylon tube must be placed over the stud where the diode passes through the heatsink. This is important so the diode does not electrically make contact with the heatsink. Additionally, 2 electrically insulating, but thermally conductive pads (or mica) must be used on both sides of the heatsink to prevent the diode from making contact on either side of the heatsink. See photos below for how to mount the diode:
Photos
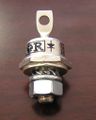
The DO-5 Diode as it arrives from DigiKey
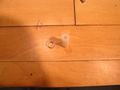
The nylon spacer shown next to what it was made from
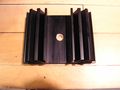
The heatsink with a hole drilled for the spacer
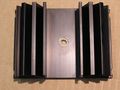
Nylon spacer inserted into the hole in the heatsink
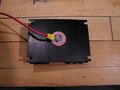
Back side - Diode mounted on heatsink
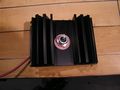
Front side - Diode mounted on heatsink


Snubbers
Solder together one lead of the .47uF, 500V capacitor and one lead of the 22 ohm 1 watt resistor. Put heat shrink tubing around the other 2 leads and crimp on ring terminals and solder the crimps to the leads for a better connection. The snubbers are then placed across the two contactors.
Low Voltage Interconnects
A list of helpful Molex connector tools on DigiKey can be found here.
Todo
Outlets and Power Supply
Cord Reel
- Todo: Perhaps this should be in mechanical instructions instead of electrical.
Final Connections
Heating Pads
3 12x15 50 watt heating pads $15-20/ea
Connecting the PbA batteries
Parts Needed
- Qty 50 8 AWG crimp on 1/4"(<- check this) ring terminals (probably wise to get a few extra!)
- 8 AWG wire (list total length used here.)
- Orange electrical tape
- 20x 12V 20-22ah SLA AGM batteries
Assembly Steps
Tapping into OEM Battery
Warning & Tips
Batteries can be dangerous and can cause serious injury or death and should only be worked on by persons qualified to do so. Both energy hazards from arcs (shorts) and electrical shock can cause serious injury or be fatal with a battery pack of this size. Battery packs are always live and cannot be shut off! The following are safety tips to help prevent arcs and shocks, but they are only tips and should not be taken as a go-ahead to perform work on battery packs. Extreme caution must be taken as it is very easy to accidentally set something on the battery without thinking or drop something and cause a shock or arc. Hire a qualified electrician to help for this part if there is any doubt.
- Remove all jewelry, especially gold, before working with batteries.
- Do not allow metal to come into contact with the batteries that could cause an arc (best practice is to not allow any metal near the battery at all.
- Use only fully insulated tools around batteries, especially in tight spaces (available in the electrical department in most hardware stores.)
- When wiring batteries, be sure the other end of the wire will not accidentally come into contact with any other part of the battery or metal frames. Taping or otherwise protecting the ends of wires is recommended.
- Wear rated rubber electricians gloves and outer protective gloves. Electricians gloves are not fail-proof and every effort should be made to only touch insulated tools even when wearing gloves.
- If electrician gloves aren't used, only one hand should be used so that a shock will not pass current through the heart.
- Always wear gloves when working on batteries (preferably rubber.)
- Install the jumpers in 48 volt sections and then connect those smaller sections together at the very end. This way voltages higher than 48 volts are only handled when installing 4 jumpers instead of 16.
- Even though the batteries are sealed, it is still possible for them to leak and splatter acid, especially if they are just charged, heated or an arc occurs. If a leak occurs, use baking soda to neutralize the acid and properly dispose. Eye protection is a good idea.
- Orient batteries in the tray to avoid terminal contact with any bolts or any metal pieces.
| General Disclaimer: (HV) (DC) injury or death hazard, use at your own risk, may void warranty. |
|---|
|
HV (High Voltage) DC (Direct Current) Warning: Traction Battery Packs, Motors, Chargers, and other HV sources could cause serious injury or death if proper precautions are not taken while working on or around such High Voltage Direct Current sources. Use this information at your own risk: There is no warranty expressed nor implied and we are not liable for any of your past, present, nor future actions. Even should you perform these modifications to the letter you could still damage any number of components in your vehicle causing it to no longer function. Even if it appears to function properly your actions may cause it to self destruct with collateral damage to surrounding properties other than your vehicle. By utilizing these ideas and instructions in an attempting to enhance national security, reduce gas consumption, vehicle "emissions", your carbon footprint, or smog, you do so at your own risk & peril. Warranty: In performing some of these modifications you may void your warranty with the vehicles manufacturer. See also our My wiki:General disclaimer |
References
<references/>